Create and publish your Android Open-Source Library in Minutes

Creating and publishing an Android Open-Source Library is much easier than you think. I am going to demonstrate a step-by-step guide to creating and publishing your first Android Jetpack Compose Library with Github and Jitpack.
Prerequisites:
- Android Studio
- An Idea for your Open-Source Library
- A GitHub Account
Steps:
- Create a new library module:
- Either create a new Project OR use an existing project(not recommended btw).
- Go to Project View from the Left Panel.
- Right-Click and Create a new Android Library module.

2. Write your library code:
- Make sure to remove any unnecessary dependencies from your library module build.gradle file and add only what you need.
- In your library module, create composable functions or classes that you want to include in your library.
3. Configure your library module:
- Make sure the
com.android.libraryplugin is there in your library module'sbuild.gradlefile. - Configure the publishing settings by adding the
maven-publishplugin.
// build.gradle of library
plugins {
    alias(libs.plugins.android.library)
    alias(libs.plugins.kotlin.android)
    id("maven-publish")
}
4. Optionally configure the Library publishing config:
// At the End fo build.gradle in library
publishing {
    publications {
        register<MavenPublication>("release") {
            afterEvaluate {
                from(components["release"])
                groupId = "com.github.sagar"
                artifactId = "neopop-compose"
                version = "1.0.0"
            }
        }
    }
}
5. Configure the Jitack Deployment:
- Go to Project’s top level and add a “jitpack.yml” file that looks like this:
jdk:
  - openjdk17 // Your JDK version
before_install:
  - sdk install java 17.0.7-open // Your JDK version
  - sdk use java 17.0.7-open // Your JDK version
The above step is important for a successful build in Jitpack.
6. Share your Project on Github:
- I am expecting you are already familiar with this step, either use CLI or Android studio for pushing your project to your Github.
- Make sure you are only adding the required files and not unwanted app module or Test files.
7. Create a Github Release:
- Select “Create a release” on the right-side in your repository home page.
- Add a new Tag/Version of your library, Title, Notes, etc.
- Create a release.

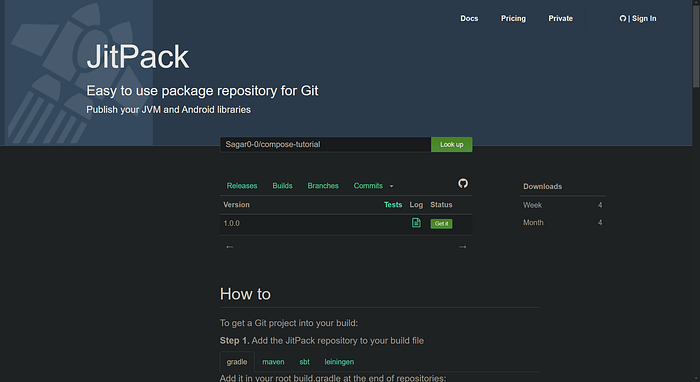
8. Get your Jitpack release:
- Go to “Jitpack.io”
- Paste your library repo link and look up.
- You’ll see all your Versions in the List, if you’re not getting make sure to add the proper config in app.
- Wait for Log to be successful(it will turn into green paper icon).
- If it is red, then you library have some build issue, first check if everything works locally. And check your Jitpack.yml file too.
- In case of an erorr, you can see the logs for debugging the issue by clicking on the red sheet icon.
9. Steps for using the library:
- Go to settings.gradle of the project where you want to use your library and paste this:
dependencyResolutionManagement {
	repositoriesMode.set(RepositoriesMode.FAIL_ON_PROJECT_REPOS)
	repositories {
		mavenCentral()
		maven { url 'https://jitpack.io' } // this line
	}
}- Go to build.gradle of the app where you want to use your library and paste this:
dependencies {
      implementation 'com.github.Sagar0-0:compose-tutorial:1.0.0' // Your library dependency, you can get from Jitpack.io
}
All Set!
If you want to learn this from a video, don’t worry I got you!
I was inspired by my recently published library “neopop-compose” for writing this article. Make sure to check it out and give a star.
Also, if this article was easy to understand make sure to give a follow, it motivates me to invest my time and energy in publishing more content like this.